|
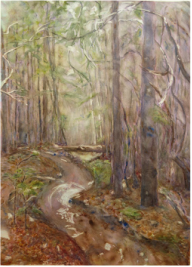
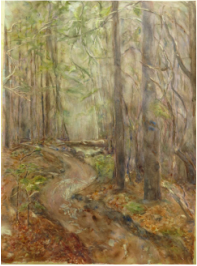
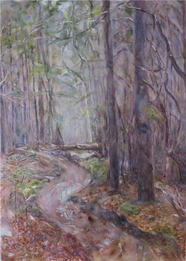
Not all paintings are successes. I recently painted a small watercolor (see 'Stand Tall' in the gallery) using a new technique for me - pouring watercolor - to create a background or underpainting for the work. For a first attempt, it came out pretty well and was even accepted in to a juried show. Fired up by this experience, I was anxious to try painting bigger and experiment more with pouring watercolors. Since several folks asked how Stand Tall was painted, I thought it would be interesting to photograph the progress of the new painting. While the outcome of the new piece didn't quite capture the feeling, mood or look desired, it was a fun process. As my teacher, Nancy Solo, has said not all paintings are masterpieces. And you can always try again. So follow my process, check out lessons learned, and let me know what you think.
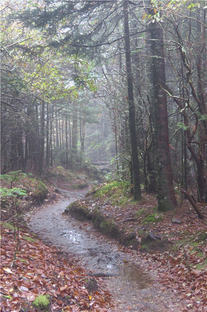
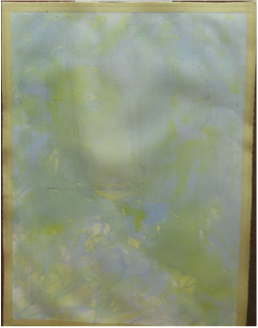
Step 1 - Used structured painting approach (tips from artist Michael Konas) to plan the painting: Intention/Mood: Peaceful, quiet, mystical Focus/Design: Path weaving through the forest, mist/fog, light area by fallen log, tall, straight trees in the foreground Color Palette: Pine greens, oranges/yellows/browns of the fallen leaves and trees Underpainting: Aurolean Yellow, Quinacridone Red, Cobalt Blue Foreground Colors: Same as above, plus Burnt Umber, Burnt Siena, Alizarin Crimson, Lemon Yellow, Winsor Blue, Viridian, Winsor Green Step 2 - Drew the picture on Arches full sheet, 140 lb cold press paper (22 x 30). Then masked the areas to preserve the white (puddles, top of log, bits of sky, tips of leaves). Step 3 - Taped the paper edges to contain some of the paint during the upcoming pour. Step 4 - Poured the first layer: Yellow. I mixed my yellow in a small jar then put it on a plate. Working on the outside deck because of the potential mess, I first wet the paper in the areas where I wanted yellow, greens and oranges and then poured the yellow (upper left, upper middle, lower bottom). I picked up the paper to let the paint run and move in the desired areas. Then poured the excess paint back onto the plate. Despite the windy day, I left it outside to let the first layer dry. Step 5 - Poured layer 2: Blue. Same process as above. This time I poured the blue in the upper areas where I wanted sky and also greens (yellow and blue make green when using transparent watercolor). I also poured blue in the forest sections to help create the "dark" moody feeling that was coming later.
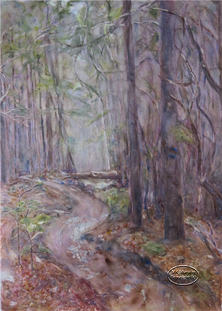
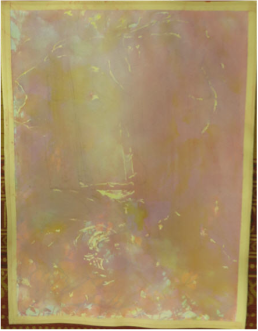
Step 6 - Poured layer 3: Red. In the original photograph, the forest background seemed to have some red particularly on the right side. By pouring red over some of the blue to create violet, the impression of forest shadows might be achieved. Finally by combining the red with the yellow where the leaves appeared, I hoped to get a "glowing" underpainting for that section. Pouring Lessons Learned: Yikes - it's very hard to do a pour on such large paper. It runs and streaks and does what it wants. It's even more challenging to do it on a windy day. But it was a very good idea to do this outside. The paint does get all over including the backside of the paper. I battled taming the red for the remainder of the painting. I should have used the red more sparingly in the underpainting. Step 7 - Next up - paint the foreground - the forest, the leaves, rocks, logs and path. Try to capture the mist, the depth and feeling. But as noted earlier the pepto bismol red kept showing through. As I tried to neutralize it with viridian is just deepened. Adding blue to get more of a purple feel wasn't all that successful either. The painting seemed to become divided between the middle yellow light area and the reds of the forest. I kept pushing the painting to get a cohesive feel. I also worked to darken the foreground trees and soften the trees in the background. I removed the masking to reveal the whites and then softened those edges and worked on the path's puddles. But it just wasn't conveying the soft, misty feeling I was searching for. Figuring I had nothing left to lose, I tried glazing the forest with a light blue wash to unite it with the center area. But too many layers and colors - the dreaded mud, loss of translucency. Glazing also lost some of the saved whites, some of which I tried to recover using a scrubber and the handy Mr. Clean magic eraser.
More Lessons Learned: Do a preliminary color sketch (thanks, Nancy). Limit the color palette and focus more on blues and greens in the forest to create the misty, peaceful feeling. Play more with how to achieve the mist. Keepers: I liked some of the path and log, trees.
Conclusions - It was a fun painting to attempt with a mix of ups and downs, challenges and thrills. Learned lots. Much like life, isn't it? But unlike much of life, there are do-overs. So yes, Nancy, I will try this painting, again.
10 Comments
Roxanna Couck
11/24/2014 12:22:29 am
final is beautiful. I paint in acrylics and always intrigued with watercolor techniques. Going to try this with my paints.
Mary
11/25/2014 05:25:04 am
Gosh, thanks! Go for it-it really is fun.
Mary
11/26/2014 08:27:10 am
Roxanna, please let me know how the pouring goes. Happy Thanksgiving!
Nancy Solo
11/24/2014 02:12:38 pm
gosh, Mary! The final painting looks beautiful... And the color echoes the source photo. And I'm not seeing mud (from here, anyway!). I would love to see it in person - ! How exciting to see your step by step process. Go, Mary, go! My ou really have your own style. You should be very proud of yourself!
Mary
11/25/2014 05:27:05 am
Thanks for all your help and advice, Nancy. My own style? We need to talk :-)
Arlene
11/25/2014 06:46:29 am
You rock!
Arlene
11/26/2014 07:55:34 am
OMG! I meant that you CAN paint a trail for me any time! Geez! In fact, I think you should paint at least one trail in each National Park!
Mary
11/26/2014 08:12:42 am
Funny! I was hoping it wasn't that bad a painting. Interesting idea about all the trails. Hmm.
Ben Guindon
11/26/2014 12:10:02 am
I really like painting and enjoyed reading about the process. Nice painting. :-)
Mary
11/26/2014 08:13:28 am
Thanks so much, Ben. Glad you enjoyed it. Your comment will be posted after it is approved.
Leave a Reply. |
AuthorMary Murphy Archives
March 2019
Categories
All
|
 RSS Feed